I’m always looking at old recipe books for interesting foods I can put a foraged spin on, and when I discovered pastila, I realized I’d hit the jackpot. Traditionally made with tart apples, I knew right away it would work with crabapples, and I already had several jars of crabapple sauce in my pantry, which gave me a head start. Crabapple pastila comes together easily with just a few ingredients. It’s low-sugar, low-fat, and loaded with apple flavor. Plus the method is pretty cool. I bet you’ve never made anything like it, unless you hail from Mother Russia.
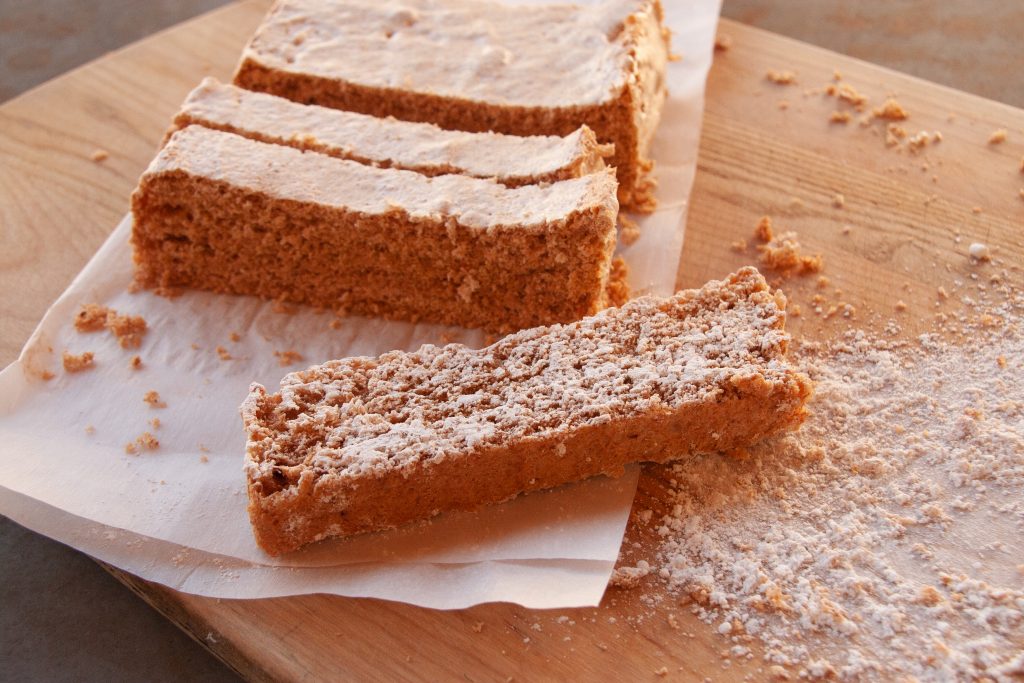
The texture of pastila is sometimes compared to marshmallows, but I disagree. While it is light and airy, it is not soft and smushy. It resembles biscotti in appearance, but not in texture. Not helpful descriptions? Well I guess you’ll just have to make it and see for yourself.
Pastila can also be made with store bought applesauce, but since that will be considerably sweeter than crabapple sauce, and since pastila is traditionally made with tart apples, you’ll need to cut back on the sugar. And yes, it’s also made with raw egg whites, so if that’s not something you’re comfortable with, you can stop reading now!
What You’ll need to make crabapple pastila
- 2 cups crabapple sauce
- 2 egg whites
- 3/4 cup sugar
- 1/2 cup powdered sugar (optional)
what you’ll do to make crabapple pastila
Combine the crabapple sauce and the egg whites in a stand mixer and turn the mixer onto medium. Gradually add the sugar in 1/4 cup increments, tasting after each addition. The tartness of your crabapple sauce will determine how much sugar you’ll add. I usually use between 1/4 and 1/2 cup.
Continue beating on medium for 10 minutes, scraping down the sides of the bowl every few minutes. The batter should quadruple in size. The amount of sugar you use may influence the volume of your final product, but not by a lot. You’re looking for a final volume of about eight cups.
While the batter is being beaten, preheat your oven to 180F. Line a rimmed baking sheet with parchment paper (including the sides) and spray it with baking spray.
Set aside two cups of the finished batter in the refrigerator. Spread the rest of the batter onto the parchment paper, and smooth it with a rubber spatula to even out the surface.
Bake for 4-7 hours, or until the top of the batter is dry to the touch. Remove from the oven and let it cool completely, then lift the pastila out of the pan, turn it over, and peel off the parchment paper. I often let my pastila cool overnight and finish it off the next morning.
Preheat your over to 180F (again!) and line a baking sheet with parchment paper. Cut the pastila into three equal pieces, and place one piece on the paper. Spread the top with a layer of the reserved batter, like frosting. Place a piece of pastila on top of the frosted layer, and use more reserved batter to frost this layer. Top with the final piece of pastila and frost the top and sides with the remaining reserved batter.
Bake the assembled pastila for 1 1/2 hours, then remove it from the oven and let it cool completely. When the pastila has cooled, cut it into 1 inch slices. You may dust the cut slices with powdered sugar if you like, depending on the size of your sweet tooth. The flavor will be apple-y and tart, with an edge of sweetness. This is delicious served with a cup of tea.
This recipe is tantalizing, and I hope my arms will hold up beating with a whisk. I love the whisk, don’t have a mixer. Next spring I’m going to plant a crabapple tree in the orchard, an obvious overlooked tree, and a little tougher than the “desirable” varieties, few of which have thrived in my city soil-mostly subsoil. Meanwhile I’ll keep an eye out for a crabapple tree, or contact our local orchardist who supplies fruit to the Co-op. It’s good remembering you, Sister, even if this all turns up as fantasy.
Hi Jim, nice to hear from you. If you end up trying this recipe with a whisk, you deserve a medal, because that will be a helluva workout!
Thank you for the recipe.
Could you, please, specify the size of your baking sheet?
My pastila, probably had been spread too thin.
It melted at the final cooling step unfortunately.
Maybe I had to cool it (after final baking 1-1.5 hours) in the fridge?
Irina K.
Hi Irina, I used two 10 x 16 baking sheets, but I might use smaller baking sheets next time to get thicker layers. I’m not sure what you mean by they “melted” during cooling, because melting is something usually associated with heat. Melted means liquefied, and that wouldn’t be possible once the first baking has created a solid. And if you didn’t have a solid after the first baking, you couldn’t have assembled the layers for the final baking. So I don’t think I’m understanding you correctly. Can you explain to me what you mean by melting. I’d like to help you figure this out, if possible.
Hi Ellen, thanks for responding s promptly.
After first baking I had a very solid layer (but thin). When I assembled it had been holding up ok. After second baking, still looking ok. After cooling for several hours at room temperature the less baked layers sipped out and made the whole thing way too soft with hard pieces floating..
Interesting. When you say that after cooling “the less baked layers” slipped out, I’m not sure what you mean. All of the layers should have baked for exactly the same amount of time: first you bake the cake flat, then you cut it into pieces, assemble them, and bake them again. So there should be no layers that are “less baked.” The only thing I can guess is that the exterior of the cake may have felt solid, but perhaps it wasn’t cooked all the way through. Or maybe the batter was spread unevenly and some parts were still soft. Because once a cake is baked and solid, you can’t un-bake it or make it liquid again. (That’s just chemistry.) It might break apart into pieces, but those pieces would still be solid. The only way to soften a cake that’s been baked solid would be to pour liquid on top of it. Wish I could be more helpful, but I feel like I’m missing part of your process.
I have no doubt I made some mistakes.
I will just try again, rather than dwell on them.
Thank you for guidance and patience.
I will let you know the result.
Please do, Irina. I want you to be successful. The pastila is so tasty and one of the coolest things is that it doesn’t require refrigeration for ages! I had read about that, and I’m saving a few pieces to see how long they really last in a closed container on the counter. So far it’s been two weeks and they still taste great with excellent texture.
HI- I WAS LOOKING FOR FORAGING RECIPES AND CAME ACROSS THIS. BEFORE MY QUESTION, I THINK I UNDERTAND WHATS GOING ON FOR IRINA. “BEAT THE BATTER UNTIL QUADRUPLED IN SIZE”. THAT THREW ME CAUSE THE NEXT DIRECTION IS TO HOLD BACK 2 CUPS FOR THE FINAL BAKE. I KNOW IF I BEAT THIS WITH 1/4 CUP SUGAR AS OPPOSED TO 3/4 CUP SUGAR, THE FINAL VOLUME WOULD VARY. I IMAGINE IRINA’S FINAL VOLUME OF BATTER WAS LESS THAN THE DESIRED VOLUME. THE NEXT DIRECTION USES EXACT MEASUREMENTS – SO THE 2 CUPS HELD BACK WERE A BIG PERCENTAGE OF THE TOTAL. SHE BAKED THE LAYERS AND THEY CAME OUT HARD AND VERY THIN. SHE THEN CUT AND LAYERED RAW BATTER (WET) WITH NOT ENOUGH CAKE. WHEN BAKED THE FINAL 1 1/2 HOURS, THE 2 CUPS OF BATTER MADE VERY THICK WET LAYERS COMPARATIVELY, AND HAD ENOUGH LIQUID STILL TO CAUSE HE CAKE TO DISINEGRATE AFTER IT SAT. PERHAPS IF WE KNEW THE GOAL VOLUME AFTER THE FINAL BEATING WE COULD GE BETTER RESULTS. OR IS THE TWO CUPS HELD BACK ONE FOURTH OF THE TOTAL BATTER, OR ONE SIXTH, OR… THAT WAS MY FIRST QUESTION, BECAUSE I WOULD HALVE THIS RECIPE FOR MYSELF. ALSO, YOU SAY IT CAN BE STORED AT ROOM TEMPERATURE FOR A LONG TIME. HOW DO I STORE THIS AND HOW LONG CAN I HOPE O KEEP IT? THANKS!!!
Thanks for bringing this to my attention, Suz, I’ve gone back into the recipe and made some edits to answer your questions. As for how to store, I kept mine in a plastic container with a tight fitting lid. The pastila was still great at three weeks, but then we ate it all, so I can’t say how long it might have lasted.